Monday, May 26, 2014

I Can See The Light At The End of The Tunnel...

... hopefully it's not a Freightliner goin' the wrong way.


The fiberglassed signal light recesses got bondoed... re-bondoed... and then spot puttied...

... and primered...

... and still... I can't but admit... there are blemishes if you look.

A body man I ain't... but it'll keep the rain and dust out.

The finish paint was put on yesterday... in enough time that I could get the garage door closed before the days storm arrived.

That few additional coats of epoxie paint will have to cure for a couple of days before I go to handling it much doing the reinstall.

... as well as the installing the new turn signals and license plate carrier frame I'm waiting on from J & P cycles...

In the mean time I've been conjuring ways to carry my auxiliary fuel bottles on long rides...

How I carried them to Alaska worked pretty well. But, I've not got that ruck any more... (that's a picture of it that generally comes in the popular posts gizmo on the right sidebar)

I've thought of racks bolted on somewhere... or plates zip tied under the new tail rack that will be going on shortly... but... nothing seemed to fit or "Feel" right...

So... with the painting done and a storm brewing... I took to experimenting with a piece of old canvas I had stuffed in a compartment, my fuel bottles and some barge cement.

One thing I'd decided was I didn't want a "permanent" mount.

No need to carry those bottles on day rides...

Only when I'm gonna be out in unfamiliar country and long rides where I might find a stretch with 150 miles 'tween filling stations.

Like on that return ride I'm planning on making to the Yukon and Alaska...

That brought me back to that ruck mounted carry.

I've drawn up all sorts of complicated racks with clamps and straps and pockets and ... to hell with all that... I decided that simple and easily replaced if it wears out, breaks, is stolen or I simply want to try something new... is best...

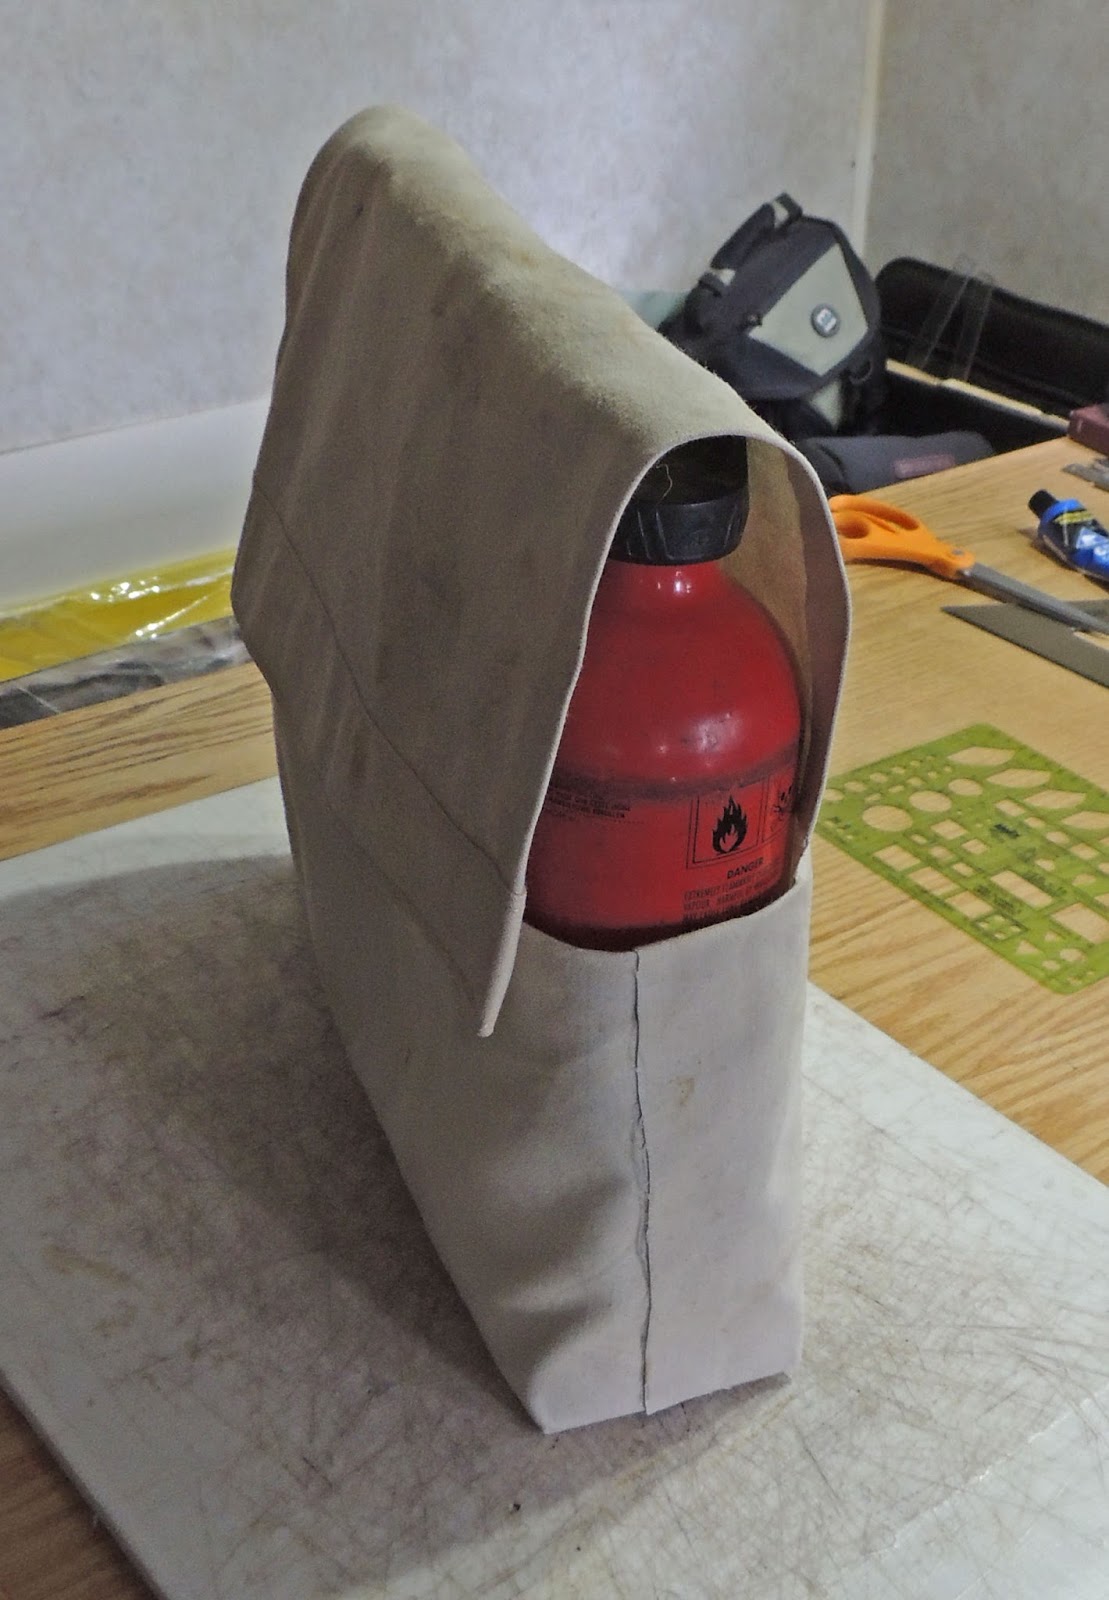
So... I've got most of a prototype, auxiliary, fuel bottle bag worked up. The idea being that it will strap/clip to my current ruck sitting on the tail rack, or whatever cargo bag occupies that space...

One piece of canvas cut to fold and glue/stitch/rivet into a bag that will hold the bottles securely but still allow easy access.


 I'm planning on adding a quick release strap running from side to side through the loops in the caps to assure retention...


And still need to add a couple straps to close the flap and straps that will secure the fuel bag to whatever part of the camp cargo I tie it too... and probably soak it in some black or OD dye ;) ... and... set some rivets to make sure the barge don't let things go... but not too bad for 45 minutes of fiddling with canvas and cement.

Need to get her done... and on the road again...

Grab Your Handles and Ride
Brian

Wednesday, May 21, 2014

Um... Yeah... so... about having things buttoned up in the next day or so...

Yeah... Not gonna happen. It's kinda becoming the refinish that won't quit.

While waiting for paint to dry ;) so I can put a hopefully last coat on and bring the saddlebags to a uniform finish... I decided to back up a couple of steps and change some things around.

Fact is, I've never been really happy with the built in turn signals on those Tsukayu Coner Saddlebags. The way they're fit in there... IDK... they just haven't "worn" well on me...

*The bags in 2012*
 They don't seal tight either so dirt gets in there and just looks wrong around the fringes of the lens.

I also decided I didn't like the license plate hanging down under, and the way I had to get a wire to it...

So... I decided I'd take out the factory signals... order a new set from J&P cycles... as well as a replacement Radiantz license plate frame, to replace the existing one which broke a wire.

There's a lil problem with that simple fix.

The factory signals are set into pockets molded into the fiberglass... But that's shouldn't really be a problem, not with me being such a whiz Body Man... Right?

NOT! ...

I gave some thought to just covering the old lights with ... something... but that would be double tacky... so then the real brainstorm... this is going south in a hurry...

"I'll just cover those recesses over, body man and all"... right? ha ha ha... yeahhhhh...

Just pull the lenses... cut out the LED boards inside...

And cover over the recesses with fiberglass...

... and some bondo...

and some paint... Easy... Ha Ha Ha....

The plan was/is... to just set the fiberglass on that ledge just below flush with the surface of the bag. I don't want to have to deal with blending fiberglass into that surface if I laid it across the top of the pocket. So I'll just lay it up to the edge of the pocket.

I should have plenty of surface there on that ledge for a secure bond...Then just level it up with a thin layer of bondo and sand her smooth.


Soooo... I scraped and sanded off the paint and primer down to the gel coat... and hung some glass...


I brushed some resin onto the ledge... then put a layer of resin saturated glass mat in. Stuck the old lens in there for a bit of rigidity... and then another layer of glass mat over that... all bonded to that wide ledge.

I'd thought a mite about cutting out the pockets.... but to be honest... I'm not sure how it's set into the body... or what I'd get into with that hole... and having to deal with the carpet liner inside the bag (cuz I'd have to put glass on both sides)... so I just decided that pocket ain't takin' up much space. ;)


 You mix the resin and you've got maybe ten minutes to get things where they need to be before that stuff sets up. Sometimes trying to get a little piece of glass cloth to lay where you want it while you try to cover it with more resin is like trying to untangle a birdsnest knot of fishing line in your reel... with your toes... drunk...

... on a windy day... while riding to town on a pogo stick...

Well... I've got fiberglass curing now... I'll smooth that up a bit, bondo and sand... and I'll be ready to re-repaint. ;) and then...

...When the new lights and License Plate frame get here... hang them on there and get 'em wired in.

At that point the scooter will be street legal again with some fresh makeup.

... unless of course... in the time between then and now... I change my damned mind again...

Grab Your Handles and Ride
Brian

Monday, May 19, 2014

My Darlin' Sonja... is Comin' Back Together... Slowly

The boss was whuppin' on me today. Eight bolts. Eight bolts only. Took me all freakin' day. Four on the exhaust header pipes... Four where the pipes mount to the frame.

Lord... never thought fishing would be a part of motorcycle repairs... but fishing I went... to find the nuts that fell into the 'black hole'...

Of all those nuts/bolts... just one... was an effing son-of-a-bitch.

The rear nut on the back jug... It's the one that can't be got to.

I finally found for six  bucks or so, a universal with a built in socket that I thought would be short enough to fit...

A couple of 'dress rehearsals' ended with the sorry damned nuts falling into a black friggin' hole...

You can see it under the exhaust port on the jug... I ran and got replacement nuts for those that fell into that hole...

But then I thought... what's the unintended consequences of leaving a couple nuts in a hole... inside an engine?...

Sooooo... I sat on a bucket and went to "fishishing" with a bent piece of wire... to hook those nuts out of the innards of my Darlin'...

Then... with some paper towels, plugging up that damned hole... I set to wrasslin', cursing, and jury rigging stick and tape gizmo's... to get the pipes re-situated onto my lil' Darlin's power plant.

I'm NOT a mechanic. A damned fine horseman. A superior soldier. A lousy half of a relationship... a fairly accomplished leather craftsman...

... but a mechanic... this puss gut cowboy biker ain't!

But... this is my Sonja. The Yamaha Mechanical sweetheart that carried me to Alaska and back... across the Arizona desert at 130 mph...

I have no option but to see she gets back together proper.


With bits of wire and tape to fish things into proper position... cursing and rolling 'round in the dirt of the shop... the pipes got reattached in proper position. and then... I started her! and she started! so the battery didnt' take a dump while she's been incarcerated on that damned jack!

I ran her up to a couple of thousand rpm for a while... and lasered the pipes with my tricky little laser thermometer...

The hottest the shroud got was 375 degrees at the head... a far  cry from the 1000 degree rating the powder coating of the pipes is supposed to have... so... good so far. A foot or 18" from the head it was 150 degrees cooler. Excellent!

I stuffed my fingers into the space around the head to pipe connection...hunting for an exhaust leak around the compression washers that seal the headers to the heads... and could find nothing...

Good!

I love this bike... I know that sounds stupid... it's a machine... but damn... I love it.

I'm hunting some new led turn signals to put her saddle bags back together... but that's another problem...

... Lousy paint manufacturers... can't do THAT right...


I picked up two cans... of IDENTICAL paint... labeled the same... "satin black"... two cans in a row...

Crap!

The lid is obviously slicker and glossier... while the tub is ... right... flatter...

Two different finishes... in the SAME... paint. and, it being Epoxie paint... I have to wait another damned week to re re-paint... arrrrgggghhhhh....

but...

There is GOOD news!!!!

When Sonja fired up for the exhaust pipe test run... there was no smoke! I'm fearing a valve guide failure... but... no smoke! :) so... maybe... another miraculous Yamaha Self healing repair!!! :)


Tomorrow, maybe, the J&P cycle order of some sequential turn signal strips... and in a week or so... I'll have the machine that somehow, feeds my soul, back on the road...

Some more work yet to do...that she deserves...

Grab Your Handles and Ride
Brian

Sunday, May 11, 2014

SpringTime in the Rockies is Obstructing My Progress...

I got two coats of epoxy resin applied to the bad lid before things went south... Put the first coat on, and it was so cool it took overnight to cure.

So... I sanded it fairly smooth and after brushing on the second coat I hung a heat lamp to bring it along quicker.

*Saddle bag lid with two coats of epoxy resin applied*

I sanded that as best I could... but I was truly wanting to NOT sand off all the resin I'd just put on!

Along in here is where I've really remembered myself that I'm NOT a body man. ;) This is the second primer coat I've applied after filling with a spot glazing putty and sanding "defects" that the first coat made real clear!

I'll sand this and likely do one more spot glazing of any small lil' faults I find... then put on the finish coat of flat black I'm refinishing the bags with...


*Sanding Primer applied*

So... I'd been hoping to do that today... and that's where things went "south"...

Momma nature had somethin' else to say 'bout that. Never thought of the Ol' girl as bein' bitchy... but I'm gettin' weary of her "spring" weather.

Since that shop building over across the way there is unheated... the temperature is 'bout 30 if you're generous... and most of what I'm using says wait for it to be 60 or better...

THIS kinda shut down the works. :)


... and then it kept on snowin'... added a few inches of wet sloppy crap on top of this...

SO... I'm sittin' inside, drinkin' too much coffee and workin' on fiction books and other projects... waiting for spring to find it's way back to Colorado with enough energy to push this gol durn #@$% winter... OUT!

Grab Your Handles and Ride
Brian

Thursday, May 8, 2014

Starting The Saddlebag Refinish

Took off all the top coat and primer and much of the gel coat.

I'm choosing to leave some of that. I took off all the cracks in it... Soooo... I'm thinking I'm good. We shall see.

First coat of resin is on. But it's pretty cool so curing will take quite a bit longer.

Plan is to sand it with very fine paper and after cleaning that, apply a second thin coat.

I'll let that cure a few days before I prep and apply the new paint.

Speaking of which, I'm going a "cheaper" but what I think is more reasonably maintainable route this time around...

... More reasonable for "hard used" equipment I think. More on that saddle bag paint later. ;)

Grab Your Handles and Ride
Brian

Saturday, May 3, 2014

A Wanderer and a Drifter

I've been wandering for the last four years... hell... that's really a lie... I've drifted since I was 14. I started wandering the Arizona desert then... Can't say as I've ever really stopped since.

Crossed the oceans... lost count of the miles...

I often think of setting up in a place that I find that's nice... even stop on occasion and start digging post holes... but soon... the sound of a truck up on the highway, or the lonesome wail of a train across the valley, the rumble of  V-twin, starts that gnawing itch to roam working all over again.

My way isn't one that many can tolerate. Most need a "place" and a "home". Hell, the happiest I've been I was in a tent.

For me it's not about trying to get somewhere either. Actually, I don't like getting "There". What gnaws at me is the insatiable hunger to just keep moving.

There are those that call it a sickness... no Eagle would agree.

The thing about drifting and wandering is... keeping your nose in the wind and smelling the sweet scent of that special freedom that only a rover knows.

Last night, after a fine day of progress on several projects I was sitting outside, the first evening in a good while without a heilatious wind roaring in the trees, and sipping on a bottle of Tommy Knocker Brewery's finest... listening to my ipod... Bob Seeger... and just soaking up the space around me. It was a cloudy sky...

Suddenly... the sun broke through just before it settled behind the high peaks of the front range... Everything was lit in a golden hue... It was as if the Boss himself had set the world to glowing.

Right at that moment... a Bald Eagle sailed over the house I'm parked beside. My rig hides in a wind break that has protected that house for over a hundred years.


That Eagle soared just over the Top of that tree... He was lit in glittering gold by the setting sun and soared over me, against the wind, for long seconds before finally disappearing behind the windbreak behind me... An awesome sight.

What's that got to do with anything?

This. It's the sweet flavor of life...

Recently I stepped off the path that I've known was the right path for me... for a long time... I stepped off for the purpose of pursuing dollars... a fools mistake... and honestly... it ate a hole in me.

Not only that, I was going to sell one of my great joys... for what? a few thousand dollars that would what? hep me... maybe... make some more?...

There's one damned word for that... STUPID.

I've been working on refitting Sonja after a few years of lots of miles and deferred maintenance, planning on selling... and it's come to me... in the last weeks as I polished her wheels, got the pipes refinished, sanded the saddle bags, buffed the tarnished fins on the jugs... that... I just can not sell her.


It makes no sense to sell off parts of yourself... in pursuit of subsistence. You'd just end up with lots of groceries... for a guy that wasn't there any more.

No idea how I'm gonna get where I need to go... Only know it won't be by selling off precious bits of my self.

Grab Your Handles and Ride
Brian